KACEY - roadgoing 4 litre facelift.
Yes, that is a suspiciously-empty garage.
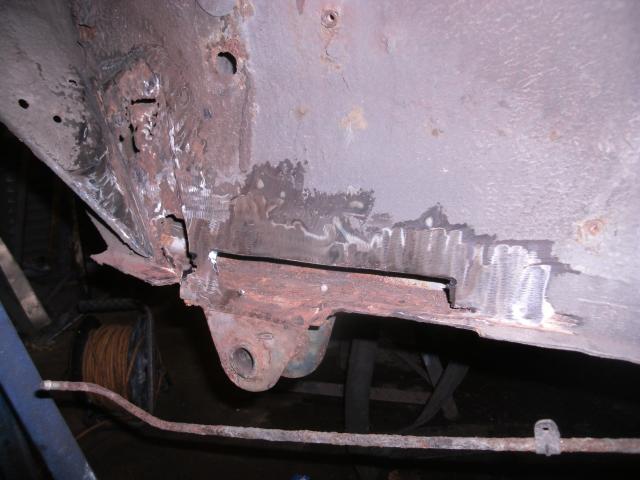
Well, that's just nasty.
No worse than most, but plainly this could be better.
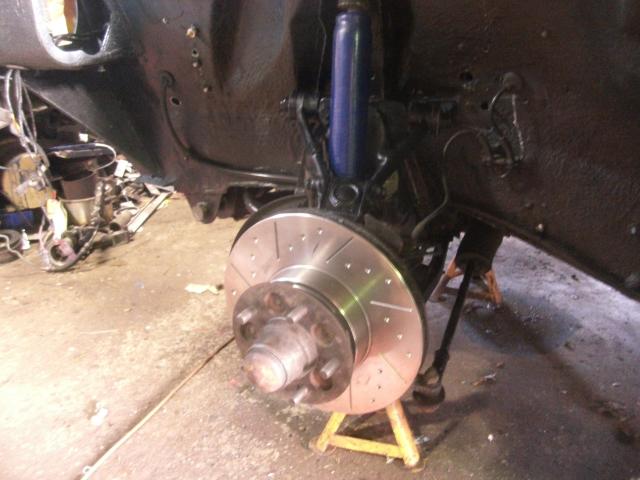
I swear we only initially planned to do the rear discs.
This is what happens when you leave me alone for too long with spanners.
Yoik.
Taking the whole thing out through the bottom is often simpler. There are surgeons who say the same thing.
Turns out it was rusty. Who knew?
Well, we had our suspicions. It was worse than we suspected.
KACEY III – the accidental restoration
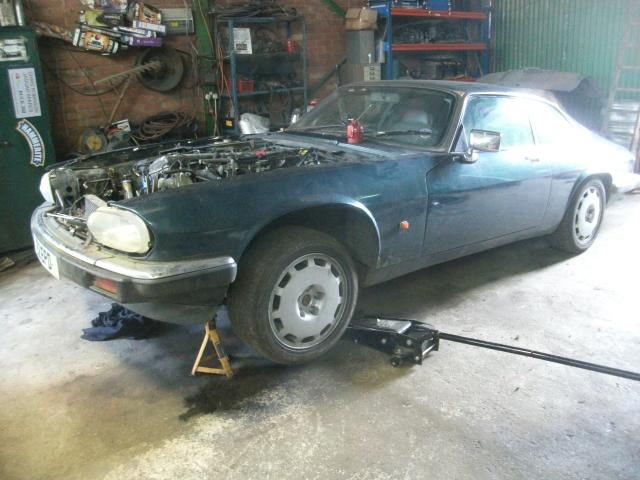
Kacey was parked up late in 2013, with a hefty thirst that was more cheaply addressed by the use of an LPG-equipped S Type, and in need of a pair of rear discs.
Then the trusty V8 threw its timing chain tensioners out of the pram, and my need for a car led to a cast about the fleet, the XJS then pulled out of her forgotten corner. Whilst peering at the rear disc job, it was hard not to notice the somewhat crispy bit on the rear sill, which when provoked turned into a hole I could put my fist in, so it needs a bit of welding.
That led to a proper look at the car generally, with a view to what it actually needed doing, rather than the initial rose-tinted view of what it wanted for a swift MOT.
And that, as we all know, is always the thin end of the wedge. Oh dear. Clear that it needed some work, we came up with a plan to actually tackle the car properly, and the old X300 was pressed into daily service whilst we had a go at this little project. You will note that when we get into this properly, the previous assessment of the car in the earlier scribblings starts to look really stupid.
I put it to you, m’learned friend, that this is always the problem. You drive around blissfully unaware of what a rotten heap of junk you’re sitting in, your road car is something you climb in and go, so long as it starts and steers and stops at 50% of its engineered potential you don’t know you’ve got a problem with it. Your track car might be lovingly maintained, your road car is just a means of conveyance. So the decision to tackle this car was not based on what we then found. What we thought we’d do is create a slightly more interesting road car out of that nice solid facelift XJS we’ve got hiding. We also decided to be less stingy than usual this time round, and spend a couple of quid.
On the agenda, other than repair and refit, a manual gearbox conversion, using an X300 Getrag box. We have spare pedal boxes because we don’t use the electric stuff on the race cars. We have the prop, because we have lighter, one-piece items made for the race cars. We have flywheel and clutch, we use non-standard items on race cars. So we have all the bits. Don’t we? Actually, no, but we don’t know that yet.
Whilst we’re at it, some engine work, we’ll have an AJ16. Except we won’t. We’ll rebuild the 4 litre AJ6 engine with AJ16 pistons, and then we’ll go a little bit nuts with a couple of sneaky engine upgrades stolen from recent lessons learned at the track.
Also on the cards, a change of engine management. Something somewhere in the existing system has gone a bit nuts, hence the heavy fuel consumption. It might be a sensor, though we swapped most of them. It might be the lambda, but that was renewed under a year ago. We swapped the ECU to little avail. So we don’t know. Screw it, we’ll take a complete, older system we know to be good, and fit that, see what power we get, but more importantly see what efficiency we can achieve.
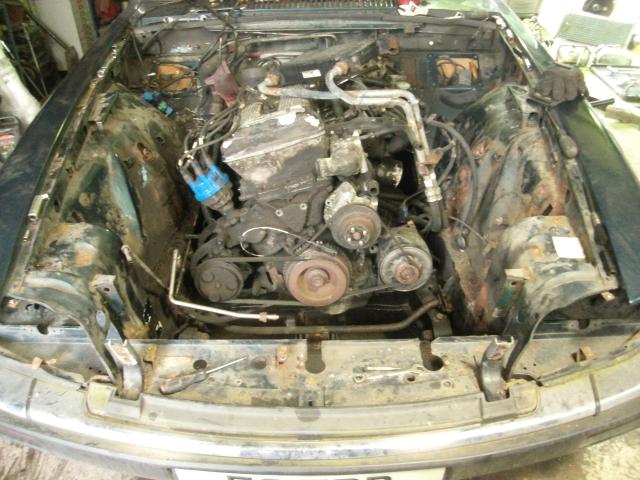
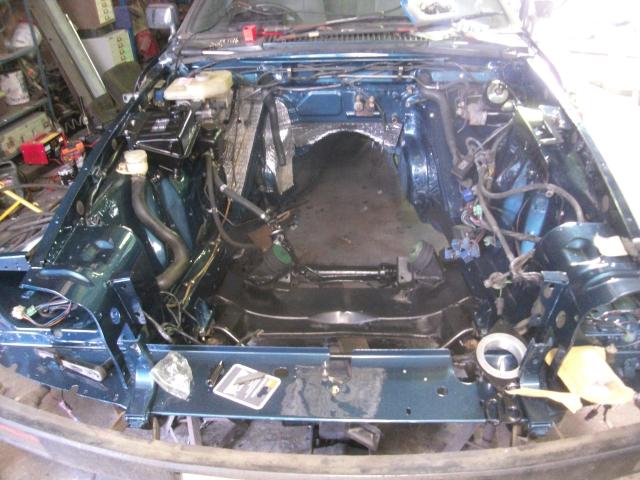
We know she wants the front shocker turrets welding, so we might as well strip the entire underbonnet. Well, why not. 25 year old road cars are not as easy to work on as scratch-built racing cars assembled last week. Old bolts sheer with a delicate snap of metal. Everything is glued to everything else with a couple of decades of rust or grime or sealant. One bolt in three loses its corners, or is so corroded you end up beating an undersize impact socket onto it. Screws with no discernible centre have to be heated and undone with the mole grips. And everything is filthy.
Carefully, because we’re saving this car, it comes apart. There are alien components under here, amidst the dead spiders. Air conditioning. Giant fans with viscous couplings. Extra belts. I think some of these things are going to find themselves superfluous. Before it’s even off the car, I can tell that big fan ain’t going back on. I’m not sure this radiator is, or that air con. And what’s with all this wiring? Which idiot put the horns there? Why would they hang 5 litres of washer fluid out in front of the driver’s side wheel? Is this some form of advanced crash protection like the barrels of water the Yanks use on whatever they call motorways?
Wiring removed, which of course means splash guards out of the wings, and lots of swearing. The wings are looking ropey at the bottom, so they’ll be coming off too, later. Throttle cable disconnected, engine mounts undone, gearbox crossmember released. Interior taken apart, centre console removed to access the selector cable. Seat out to allow the carpet to be taken up, partly to get the wiring all the way out, and partly because there seems to be a hole in the passenger floorpan.
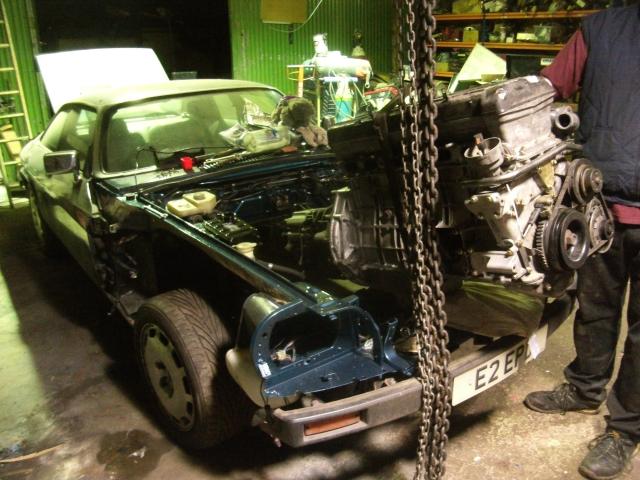
Cooling system is already on the floor. Exhaust removed, and of course that was seized up, all six bolts had to be cut to separate the intermediate pipe from the rear over-axle pipes, an hour of rust in the face for your troubles. The prop was resolutely going nowhere, but that’s OK, as an auto it will simply slide apart as the engine comes out.
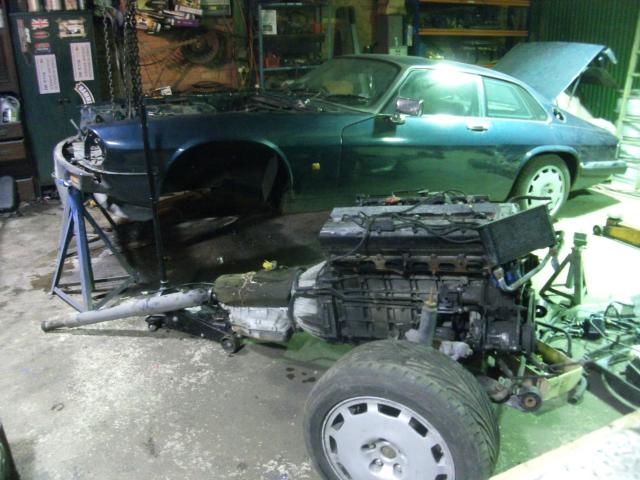
Looking at it, the auto box and its pipework looks like a right old lump. We might as well send this lot out of the bottom on the subframe. Split the steering column, pull the brake lines, drop the shocks, lose the earth strap, whistle off the rear metalastics, and pull the big cross-pins. One of them, despite the fact we fitted it, is stuck in the bush. Trying to rotate it broke a ½” drive extension, and I think one of my elbows when it let go and I fell like lumber, still clinging hopefully to the breaker bar that no longer had anything attached to it.
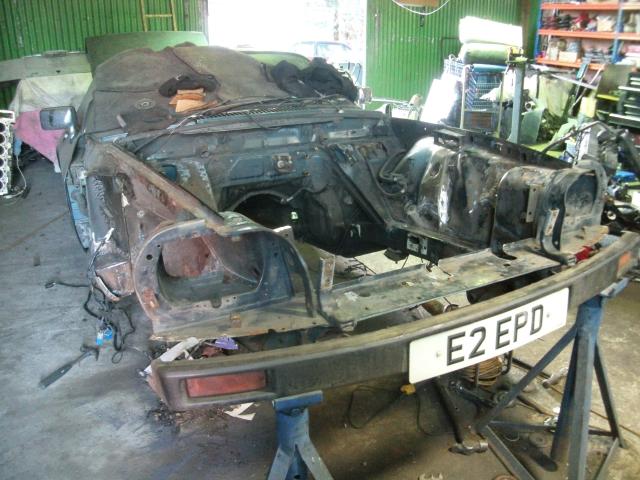
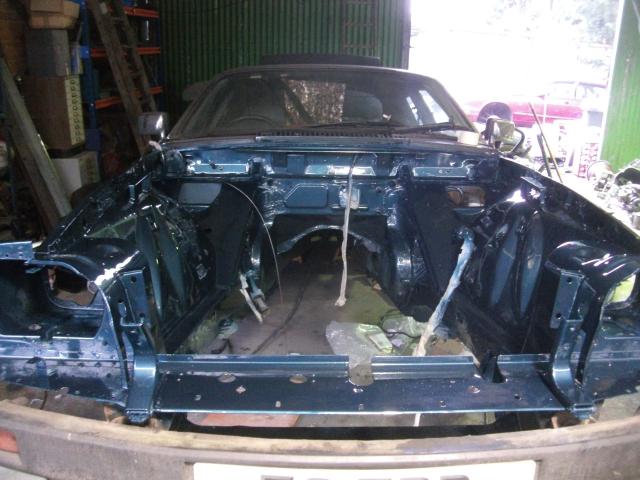
Fire cured that. Out slides the subframe, engine and box, wheeled away for its surgery. A flurry of spannering denudes the underbonnet of everything else.
Wings come off, having learned that for some reason they are brazed to the shell in one spot. Why, I do not know. Not easy to address that, but they both fall off, and we’re suddenly down to a bare front end. Having now shaved the patient, time to assess what surgery we’re doing.
It doesn’t take much poking before a simple answer presents. Lots. There will be some welding. Everywhere. It’s not quite dead, it’s nothing like some of the stuff we’ve done, but it’s not good either. Worse, it’s not getting blasted. The rust has had the manners to attack specific locations but leave others alone. It means I’m not going to get carried away and seam-weld it, though it was tempting, but if I do that I’ll do the whole car, and then throw out the carpets and trim, and then it won’t be a Jaguar anymore. The plan is to still be an XJS when we’re done. A better XJS, but one that retains most of the original design.
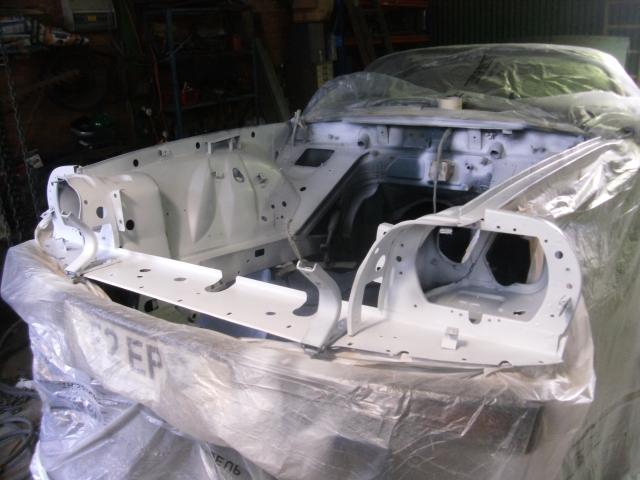
Front wings off. Again, it being a road car, more to remove than usual. It’s a non-bodykit car, so it has full wings, including the lower quarters we usually throw away. The chrome bumper is intact, save for shearing off every retaining bolt. The chin spoiler is steadfastly unwilling to lose a single screw, each of which is carefully ground off to allow the undertray off.The spoiler won’t let go of the lower wings at all, but on the driver’s side it’s not a big issue as the wing has rotted off.
The passenger side accepts some strategic grinding on the rear of the screws to remove that too. Spoiler having hit you in the face, the lower grill comes out, without having to remove the screws because there was no wing left to attach it to, and that’s if there had been a grill left. Never seen something appear so intact but be so gone, it simply disintegrated and fell out. The metal panel that links the lower wings was also buggered. This is the odd thing, this car really did look stout.
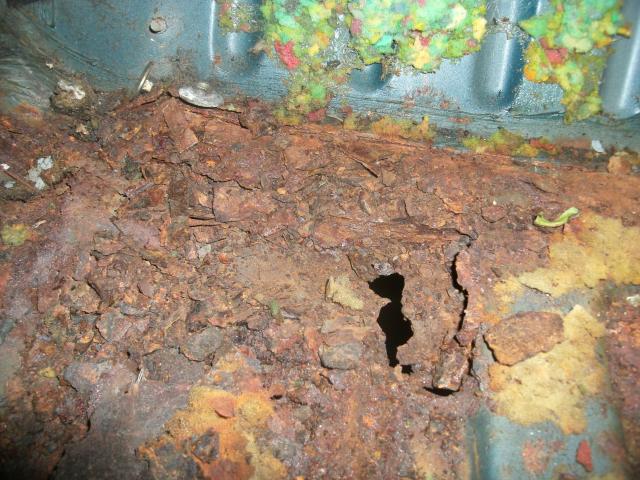
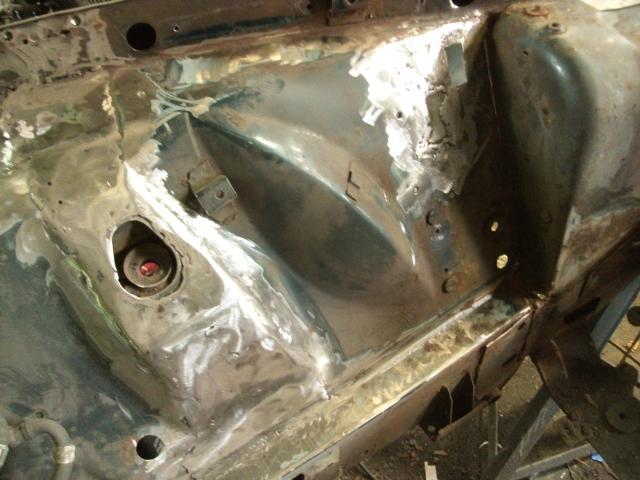
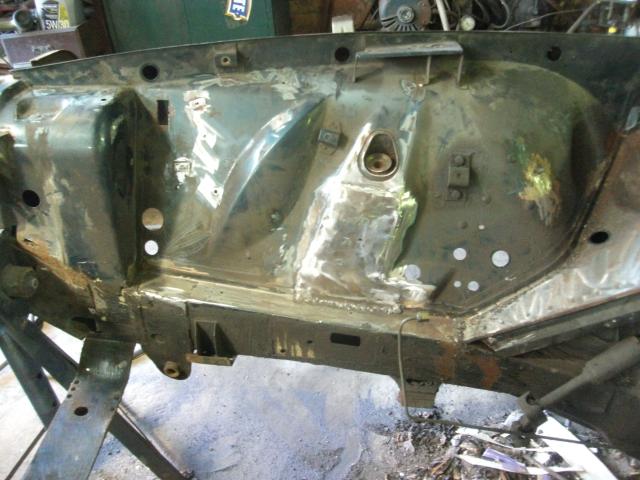
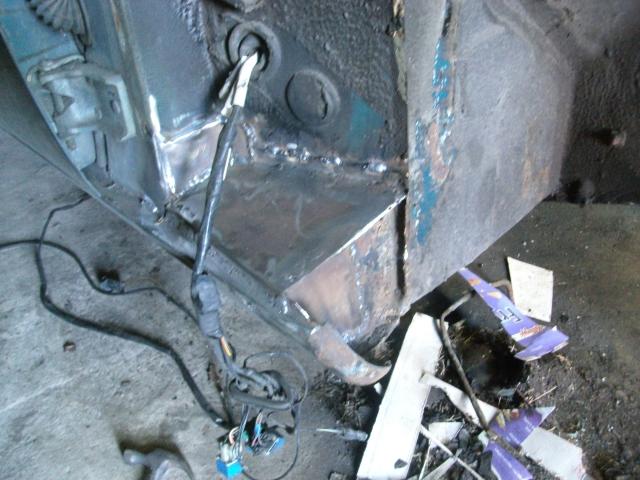
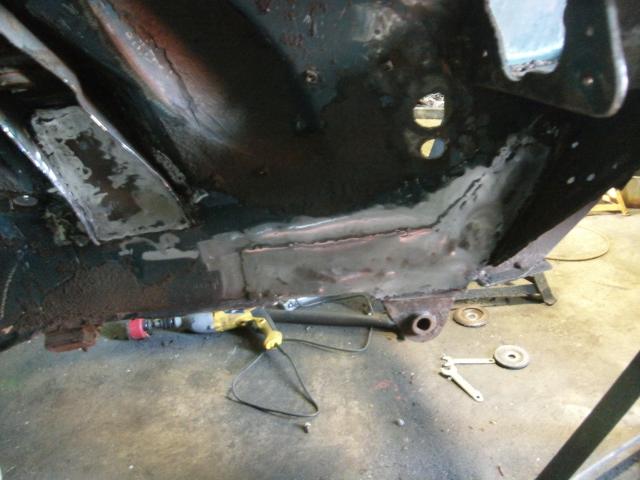
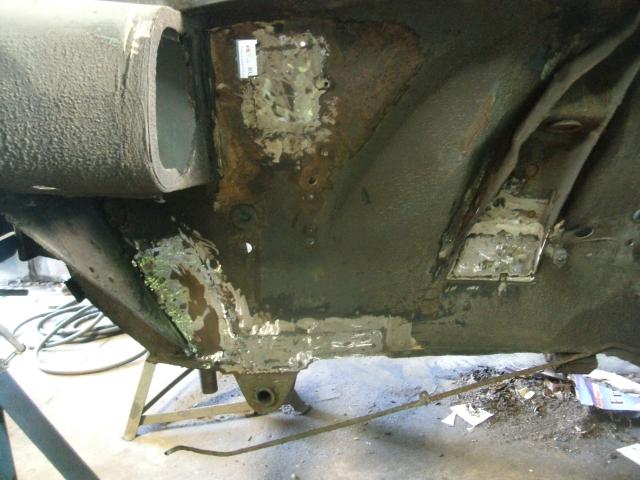
So there will be some seam sealant and underseal that’s going to catch fire at some point, we’ll just have to accept that. Problem areas – chassis legs, both sides, at the front where the subframe mounts. Shocker turrets, both sides. One was already patched, badly. Taking the patch off revealed that what looked solid from the other side was not. Small hole nearside inner wing, where the airbox attaches. Foot of the A pillar was gone both sides, and sill tops in the same location. All want repair.
Floorpans, both sides. Passenger side needed a large plate letting in. Driver’s side merely needed patching. Passenger side rear sill was gone, and needed some reconstruction of the jacking point/sill/inner arch area, but this is such familiar territory by now. I threw in some extra strength for the front anti-roll bar mounts too, just in case.
Other areas of rust are merely cosmetic. Everything is stabbed with a chisel to find places that may not have yet gone but are thinking about it. Then everything was welded. If you’ve ever visited this site before, you know that we weld things. I’m not going to explain that we weld things yet again, save to note that things needed to be welded, so they were. I do have to restrain myself. The temptation to cut away the headlight pods and add bracing in a few locations was strong. It just seems wrong not to throw excess weight away.
A couple of tiny changes creep in. The oil coolers never come on and off without ruining their threads, we just assume that. If we want this off again at some point, and we might, we’d rather not buy a new one, so the panel is cut, race-style. You really can’t tell, so who cares?
Looking critically at the airbox, it doesn’t look good enough to me. The facelift car has a cold air feed above the radiator, but the air intake is incredibly narrow. It widens, which is correct and good, but the diameter at that choke point just seems too small to me. So that will want another, better look, and likely at least some small modification. To broaden my options a small change to the headlight pod, one of the inner skins removed, and a hole created in the rear into the engine bay. It’s how we ran roadgoing class race cars, and we know it works well. If we don’t use it, it will simply accept a blanking plug, but you can’t come back and create this later, you need space to work. Better to cut it and not use it than need it and not be able to do it.
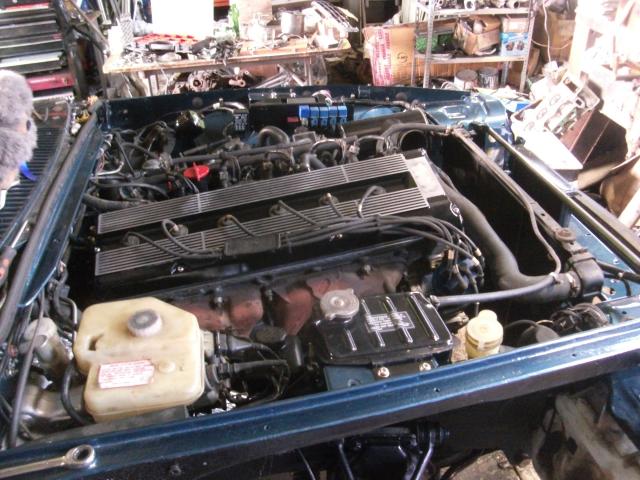
Everything having been welded, ground, and finished, etch primer, then filler to smooth any still-obvious welds. We’re aiming for a decent cosmetic finish under the bonnet. Ironic that under the wings we’ll underseal it again, and therefore end up cosmetically inferior to our track cars, but then track cars don’t have run in British weather all year.
Paint took a while.
With cosmetics in mind, every removed bolt was sent for gold-cad plating.. The gold appears to be more resilient than straight zinc plating. It’s a little gaudy perhaps, but it’s not daft, we’re not chroming things, just bringing a few bits back to factory standard. I bet, new, they looked pretty nice.
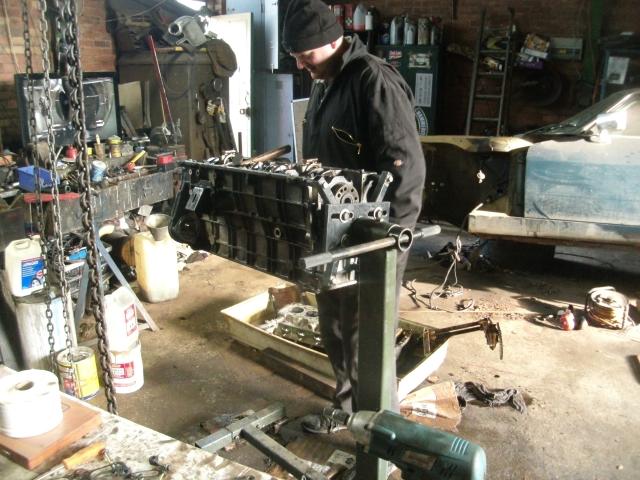
In the engine department, a Bear examines the incredibly filthy lump that came out. But, when washed off, it’s amazingly clean underneath. Too clean. No way this has been under there since 1991. We know this car had lots spent before we got it (clearly not on proper welding!) and the evidence seems to be that it may have been on the engine. Bearings are all good, no hint of wear, the bores are good, rings are tight. The head that comes off has a too-clean gasket, and somebody has made a crude attempt to port-match the manifold. Somebody’s been in before.
So, rather than interfere, because it ran well and passes Bear inspection, it all goes back. Except the head. We swapped the head, and had the new one skimmed for luck. Why swap the head at all? Because. We’re also going to throw a spare oversize throttle at it.
Engine bay painted, various bits can go back on, not least the new manual pedal box. I threw away the big asbestos heat shield under the bonnet, swapping it for a few pieces of judiciously-chosen heat-resistant sound deadening material. Well, no sense carrying asbestos if you don’t have to, right?
A few new bits, but nothing serious. Just cleaning everything is helpful, a few bits scratched and painted changes the end result a lot. Every rubber bobbin had sheared, so I got new ones. Brake clips were broken, so I fitted alternate fixings. None of this is hard, or expensive, but it neatens the end product.
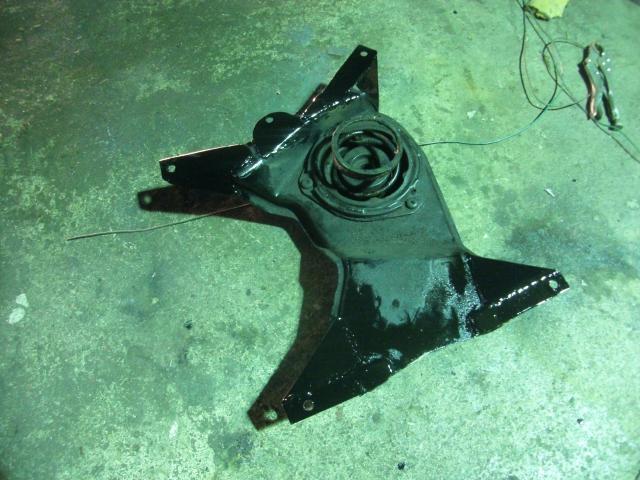
We fit the subframe first this time, the engine will go back in from above. A quick once-over for the subframe, because it was swapped by us only 2 years ago. The only real change is to throw some spare Gaz shocks at it. They’re meant to be for racing purposes, but they’re not up to the job, so instead of knocking about on a shelf we may as well put them on to replace the tired items it has now. New engine mounts, V12 type instead of 6-pot, we prefer them. New subframe mounts all round, I was going to fit our now-customary modified versions to improve location, but spare polyurethane off the shelf are probably better for road use, so we did that instead.
First, of course, refit the front ARB, which was grotty as hell. Scurfed and painted, it showed considerable wear within the bushes, but it has not lost so much diameter that I think I’ll notice.
That makes her mobile again, and having changed bays, time for the engine to drop back in.
After we fit what was 75% of the point of the project, of course, namely the X300 manual gearbox. But we’re using solid flywheel, not the dual-mass thing. It’s easy when you know how. Being an AJ6 engine, no need to grind the backplate first. You do need to change the thrust bearing carrier for one of the correct length though.
We’re coming up with an odd mix of bits here. Facelift car, very old cylinder head, newer gearbox, old-style flywheel, with the wrong throttle, and what will become the wrong engine loom. There is a point to all of this, honestly. More power, and increased efficiency. That’s the plan.
We had assumed that a conventional pre-facelift manual gearbox crossmember would fit. We have many of those. No. Nor does an auto, of any year. We don’t have a manual facelift crossmember.We make phone calls. Nobody has one, or actually knew they were different, but a look at the JDHT website makes it clear that they are substantially different, just unavailable.
Now, all I need a gearbox crossmember to do is 2 things. Number 1, bolt to the car, and number 2, support the gearbox. I don’t care how it does either. The existing auto crossmember will bolt to the gearbox, but not the car. The car has all the holes and captive nuts I need. This is not therefore complex. Out comes the welder, and there is some fabrication. The facelift auto crossmember now accepts a manual gearbox, and bolts to the car in a new way. Done.
The tunnel top, however, doesn’t like it either. The “duck’s foot” from a pre-facelift should fit, but doesn’t allow the gearlever to select all gears without the occasional most un-Jaguar-like collisions to occur. Guess what happened next? Yes, the welder and some fabrication. Basically an auto tunnel-top was hybridised with a manual one. The manual version, for the record, is an insane construction that has no relevance or bearing to the clearance required beneath it.
Did we have a spare rubber gaiter for the gearlever? No. Actually had to buy that. Outrageous.
What of the reverse lights? Damn. Locate and rewire those to the switch – an auto car does things differently. We do have a manual ski-slope, happily, but the trim is long since gone. Well, why not paint it body colour? It’s a bit different.
The clutch hydraulics pose an issue. The master cylinders we have on hand are earlier types that point the wrong way, they don’t work with the massive electro-hydraulic brake reservoir. Fortunately a saloon item points the right way, and you can change the rod in it for one of the correct height. A braided hose completes the system.
At that, finally, we have the parts for the manual conversion. We thought we already did, but we’d not reckoned on Jaguar changing everything for no good reason. We should have predicted that, they always do.
Brakes were moved over to braided hoses whilst we’re here. The paintjob was pure affectation. What with everything being black or blue/green, a splash of blatant red just seems appropriate.
A lot of cosmetic effort has gone into some of the bits whilst she was in pieces, and very swiftly we have a more professional-looking car appear. We think so anyway. It’s sure as hell better than it was.
The cooling system gains new hoses. Silicone for the hard-to-replace parts, new Jaguar for the easy ones. The rad is the original unit, but the fans were all thrown away and we’re fitting an X300 fan pack, suitably chopped down and re-mounted. Why power a viscous fan if you don’t have to?
I elected not to refit the air con at this stage. I will fit it, in due course, if we think it’s necessary. It wasn’t working before anyway, so we’ve lost nothing, and until I find out where I can get an old system replenished, I’m not carrying this stuff about for no reason.
Time for wiring. Not full racing-car stuff, we’re making some tiny modifications, and changing the engine loom to run an older-generation system, one without lambda. Something was awry with the car before, and the simple solution is to fit a system that we know worked. Vanessa sacrifices her loom and ECU. She won’t need them anyway, next time she competes it will be with a different engine. It took a David a(n) (un)happy, cold, weekend to decipher how to adapt a 1992 automatic facelift car to accept a 1989 ECU and engine loom and realise it was now a manual car.
But turn the key, and she fired up. And ran nicely. Warmed up properly, nothing exploded. Small fuel leak. In the scheme of things, not bad.
Throw all the trim back in, time to hit the button and go for a joyride, right?
No.
We’re about halfway. I’d had no intention of carrying out a full restoration, but that’s pretty much how this is going now. Damn


See, now that's just not right.
Passenger side floorpan can be added to milk in a bowl, and enjoyed for breakfast. The ECU also lives somewhere in these exotic conditions.
So we fixed it.
Welding, and stuff. We do that.
More welding. It takes longer to do than to photograph.
There is a point at which it becomes knitting. But how many cars are running around with this sort of problem, unknown?
And the other side. You get the idea. Much welding. Again.
Had to make this bit. No, I hadn't expected to have to.
Primer, post-filler. What we didn't know was that white is a perfectly servicable undercoat for anything except Kingfisher blue.
Paint. It comes in a tin, squirts out of a gun, makes cars shiny.
My career in advertising starts here.
Bear takes a gander, and other birds, at the engine. It's got six big holes in.
We did do some stuff under here too. Discs, shocks, bushes, mounts, hoses, brake seal kits etc. Guess which bit you can't see here.
You won't find this in any of the parts catalogues.
Seriously, you try finding a genuine facelift manual crossmember? And why did they change it anyway?
Yes, an X300 fan pack can be made to fit an XJS radiator.
We did make some concessions to road use. Some sound deadening to replace the old asbestos shield seemed sensible. Don't worry, it's closed cell foam.
Now that looks a bit different.
All the old parts that weren't broken, with a makeover.
In goes the refreshed engine, and manual box. The Bear isn't going in, we don't fit them as standard.
It's almost as if we know what we're doing. It's not a claim we usually make.