JAGUAR XJS RACING
HELEN: Resurrection
McShare with cheese

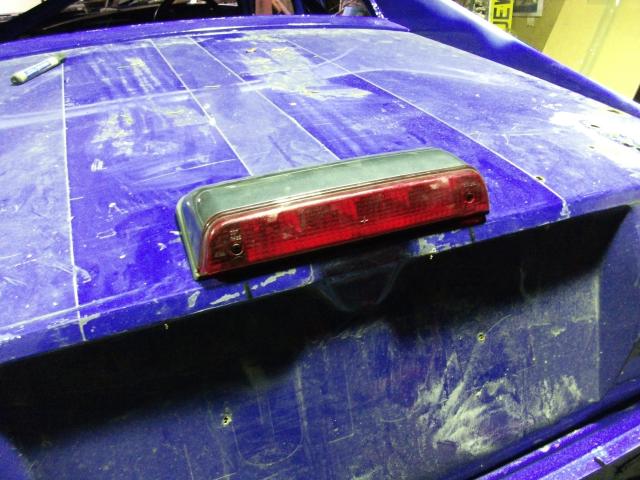
New rain light. Finally got sick of the expensive little round thing we have been using, because it's useless. MSA and FIA approved, but they're crap. Here is something a bit less technical.
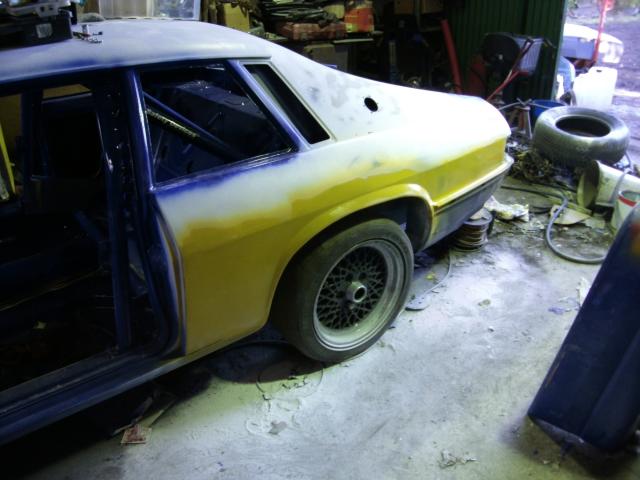
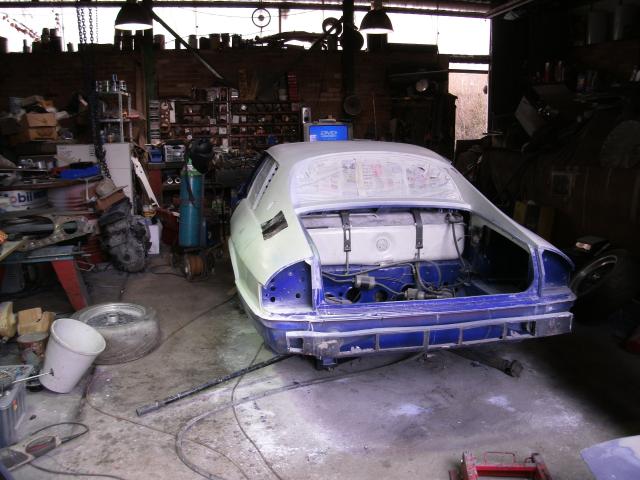
Bodywork. We don't like it, but it has to be done.
Filler and marker coats rid the car of her old body damage.
The arches are a real pain in the bum.
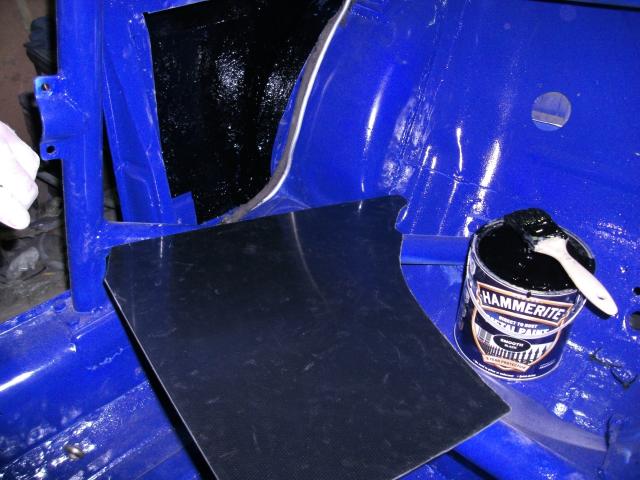
I don't like the stuff, but it has its uses. The inner arches get liberally lathered in Hammerite.
Interior trim hides my shame, that shiny ABS we like so much.
More of that pumpkin primer covers the bare metal exposed by sanding.
Looks right, but there's another week here making that wheelarch the correct shape.
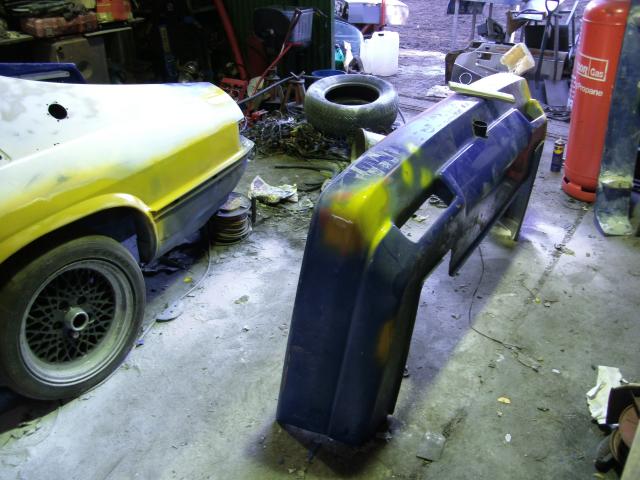
Rear bumper repairs completed, minor damage from Simon Seath (Mallory 2010) on the nearside, Papa Doyle (Snetterton 2010) on the offside. Small scuffs picked up in her prime, but you can only wear the scars for so long.
Filler, sanding and primer complete, now the tiny pockmarks are treated to a rash of spat-o-rapid, which might just be the best name ever.
Fail to let it dry properly, however, and instead of a short cut you find a lot of extra work.
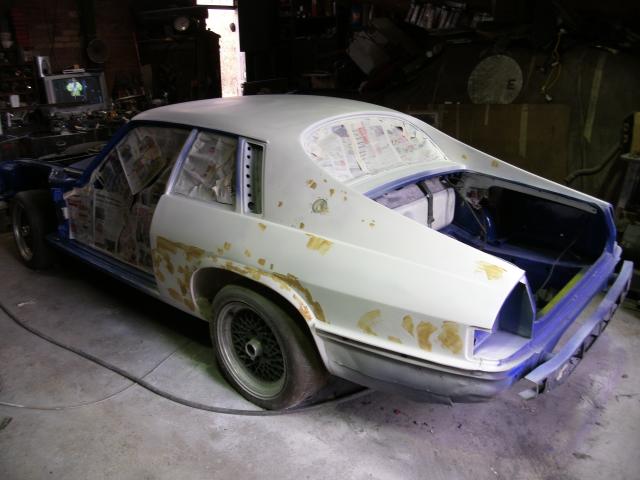
Filler complete, the body bathes in the ice white of 2-pack primer.
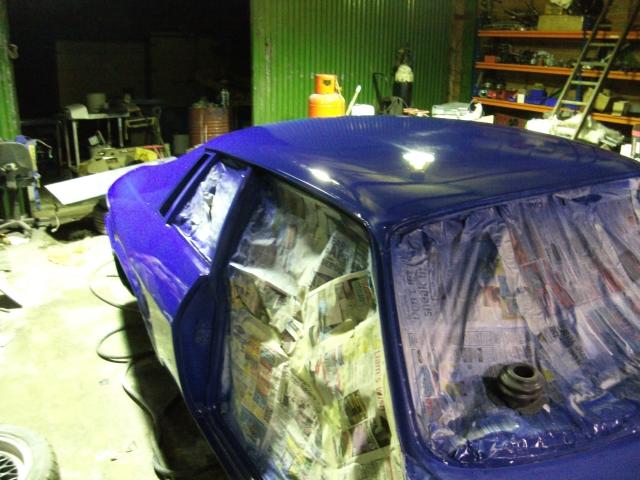
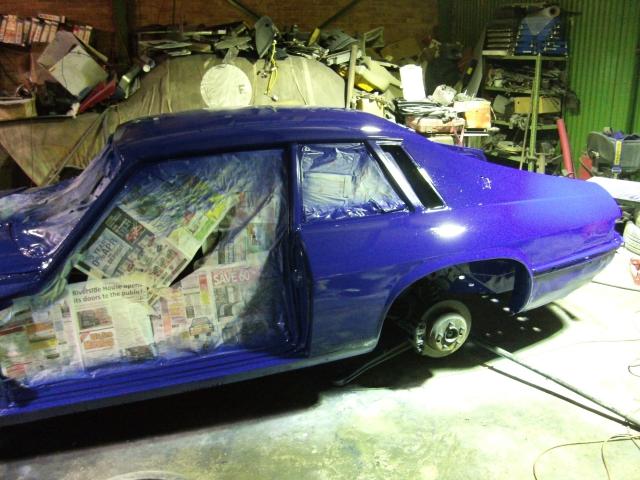
You read a lot of newspaper print when painting. The artices are much more interesting when applied to a car than they ever were in the paper itself.
And am I the only one who then goes in search of the second half of an article?
Wet sanding the primer, with particular attention to retaining the sharpness of the panel lines - easy to "soften" the car with a thickness of paint.
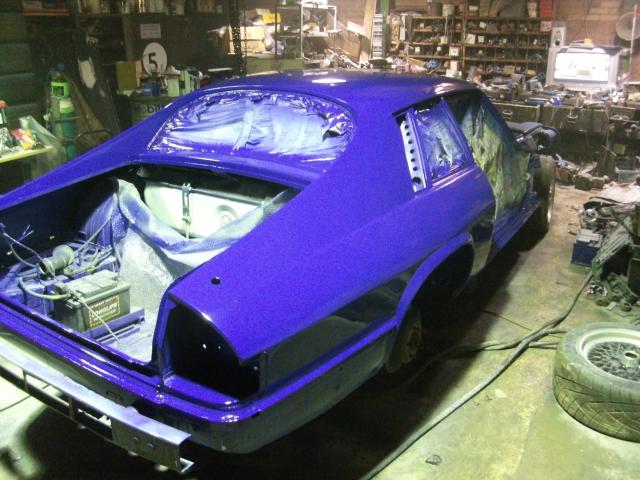
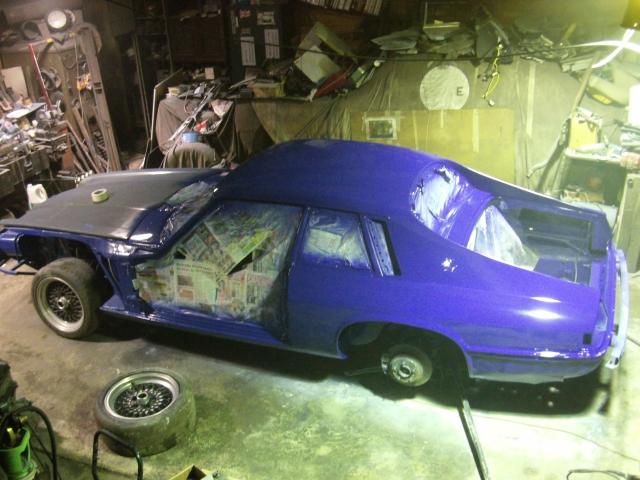
So, for something to do, I blue myself again.
Been waiting a couple of weeks to do that.
The new paint is a much better shade too, the deeper colour pretends to be a bit more glossy.
It's almost like we planned it.
Of course at this stage I've not seen it in daylight. The problem with having a job is that you do all this work at night, it might look like I painted it with a hoover.
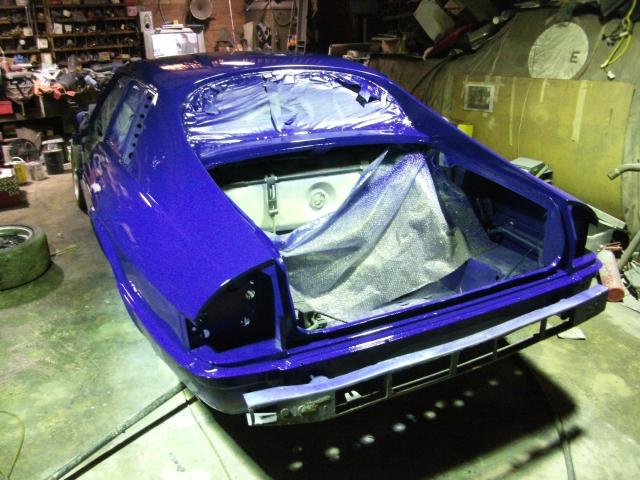
A lot more time was spent this time round on the "detail" pieces of the car, so that the rain gutters, iinside of the buttresses and the like were to a higher standard. I'm trying, at the very least.
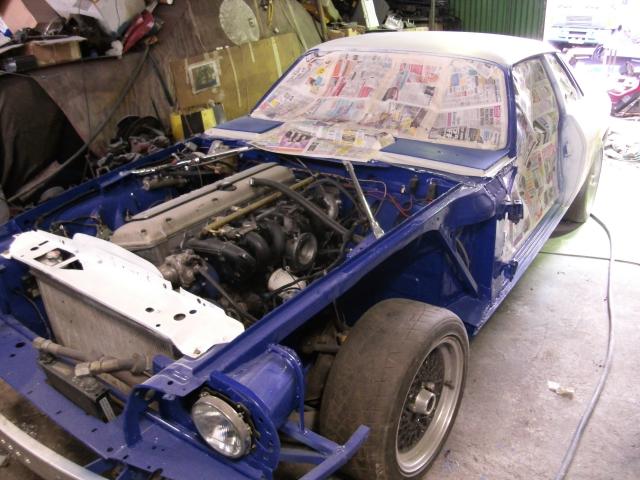
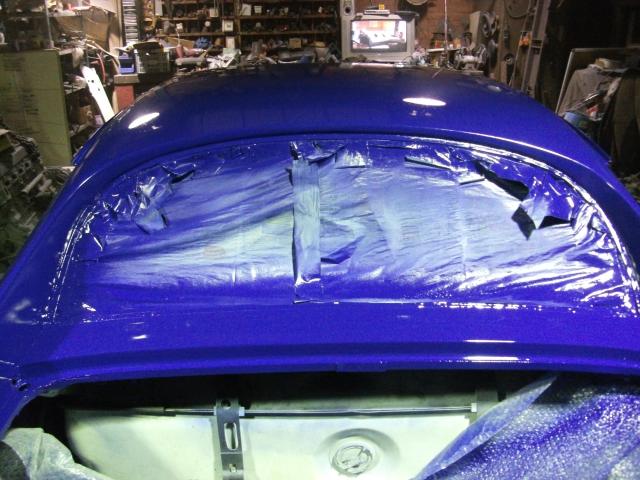
Gratuitous overhead shot shows the 3.6 bonnet thrown on to save the engine bay.
What it doesn't show is that I've cut the inner frame out of it.
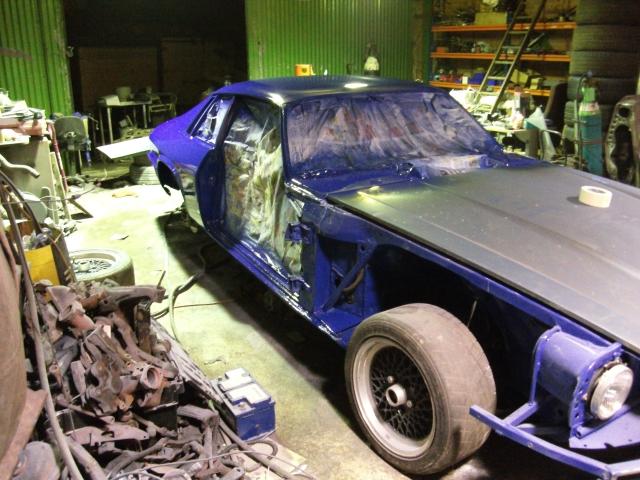
OK, you get the point by now. It wasn't blue, but now it is.
Here's another shot of it looking more blue than previously.
Blueness, again. The panel repairs took a long time, OK, and I did it all by hand because my father stole my sander in order to paint his staircase pink, so I went a bit camera-happy in celebration.
No, really, his staircase is pink now. Colour blind people shouldn't be allowed to decorate.
On the right, a blue car. No obvious dents or deformities, but I bet there are some.
Part 8 - bodywork.
The single worst part of every rebuild, and made worse by the desire to make this one our best yet....
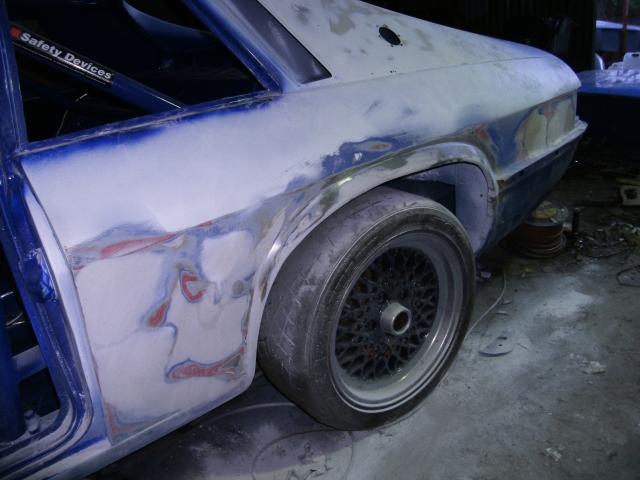
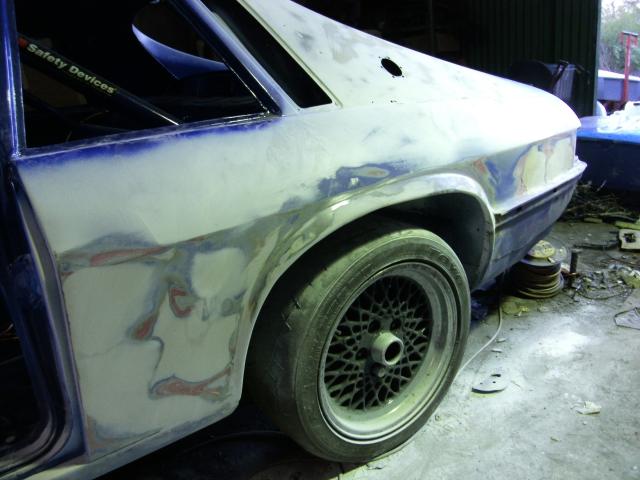
Time to crack on with the exterior bodywork, and it's a part of the job I dread. If you're not a professional painter, and I'm not, I sue doctors to eke a living as a professional leech, then this is a bit of a nightmare.
It's all in the prep, and there's no shortcut to this. Find the dent, filler it, sand it, primer it, discover you didn't quite get it, try again. What look like flat and perfect panels show themselves up as waves of distress as soon as you run a long sanding board across them, and you can feel dents you can't even see.
Worse than that, a tiny high spot in a panel, and there's no choice but to knock it into a dent, because it's easier to fill that dent than raise the level of the rest of the panel.
After a few cycles of this, you lose all track of where you are, because some areas of bare steel nestle alongside thirteen differing colours that tell the story of six previous goes at erasing a dent, and one of them might date from 2009. It all ends up coming down to the feeling in your fingertips. Just don't actually sand anything with your fingers, because you'll leave valleys shaped exactly like your hand.
As you might have gathered, this takes time.
The roof is the easy part. I wasn't aware of any damage to it, so denuded of stickers and coarsely sanded down, the main work really was in the detail of the rain gutters which didn't get a lot of attention last time round.
Such attention to a race car is completely stupid, no question about it, but really the purpose to it is to ensure a clean field for the rest of the job. Any amateur painter will tell you the tale of the occasion that they were just laying down that one perfect gloss coat they'd waited their whole life for when they encountered that one little dirt trap they missed in prep and blasted grit into the biggest panel on the car. Not getting me this time.
A coat of primer finishes the roof, wet sanding with finer grit paper is all that is required here now. The rest of the car is a different story, because there are old war wounds, bodges and rust to tackle. We got rid of the rust from the arches, but with that amount of beating, welding and grinding, they do take their time to put back into shape.
The arches are curved in all three dimensions, and they want to look right from all angles, even when swapping your wheels. Drives you potty this, because get it right one way and screw up the other two. It's a full week before I'm happy they are even close. The panel damage to the front of the rear wings is also problematic, the driver's side didn't even appear to be wrong, but the rubbing down block said it had a crease in it, and it's not an area that's ever had any accident damage.
The rear part of both rear wings did, however, take a lot of sorting out, and this is the area of the car that got the benefit of the "it's close enough" and the "there must be a sticker that goes there" approaches to painting. You can only sand one part of a car so many times. Eventually you have to say that you've finished.
Primer, and then the joy of wet-sanding the car. The great thing to this, other than getting soaked to the skin in grey-white water and the opportunity for both trench-foot and crotch-rot, is that the addition of some Fairy liquid means you're double-damned sure you've degreaed the thing whilst you're at it.
Again, for the amateur sprayer, the moment that a series of small white circles suddenly reappear in the middle of your work because an invisible spot of something was left on the primer will make you mutter like Muttley.
This part of the job is also where a concerted attempt is made to sharpen the lines of the car. The repairs have had perhaps half a dozen coats of paint, and all in awkward spots, such that you can be left with the lines of the wheelarches, or the roof/wing join being softened by the thickness of paint. These are therefore carefully sanded, which can only be done by hand, or rather by fingertip, from all angles to ensure you don't leave tramlines in the job.
Finally, after about ten days of prep, she's ready for gloss paint.
This is the part that scares you a little, because after all that prep work, you get one chance to get this bit right, and you can cock it up eighteen different ways.
Fortunately, this time, I didn't. Painting in the deep of night by the power of 4 overhead lights is less than ideal, but there is little choice at this time of year, when the car's ready for paint you paint it. That irksome thing you do in the daytime that pays the bills demands that the car project fits around it, rather than the correct way round. One day I will persuade the world that we should all take the daylight hours to work on cars, and squeeze the work thing into the other times of day, but thus far this hasn't caught on.
So, it's now blue. Hurrah.
Barely is the paint tacky when the pieces start to go back on, but the other part of the paintjob is already underway. There are still 11 pieces missing - front and rear bumpers, spoiler, doors, wings and sideskirts. All of them want repair, modification and repainting.
The bonnet is a steel item off a 3.6 we stole from Dermott - Mr Power4Peanuts to you, which, as the television in the garage played a dreadful film about mummies, the angle grinder and I rid of its virginity, carving out the steel frame. It only loses about 8 kilos, and the weight limit for the pre-93s is such that I can get this car under it with ease, but it's the right end of the car to lose the heft.
We know the car won't be finished for the shakedown run at Cadwell, but it will be finished, meaning the parts that are done will be done well, but there will be more to do later.
It might sound like a crackers way to run a project, but this is such a change throughout the car that there is a limit to how much we can test at once. Shift the weight balance whilst lightening the whole car and stiffening the shell, stiffening the car in roll, solid-mounting the front end, engine and box, and the handling might well have altered. Add a host of new parts to the equation and throw 888 rubber at the car, the potential for it all to go rather wrong is pretty clear.
With that in mind, the first shakedown will not feature the rebuilt subframes or the engine changes we had planned. One step at a time. We've made the mistake of changing too many items at once before, and it doesn't end well. The shakedown is planned to be just that then, an assembly and component check rather than a full and finished product.
For now though, the car has to be finished, in that the parts to be fitted are done, complete and staying fitted. Everything has to be polished. What isn't polished is painted. What is neither polished nor painted is at least cleaned.
Items that in the past were hung from tie wraps, such as the water pump, are now more robustly mounted. Making little brackets, inventing this sort of stuff, takes forever. I could spend a year finessing this car, but it's all learning, everything I have to figure out for this car will be applied to the others later. Which is how, having taken three months to build this car originally, we did the next one in six weeks.
In an attempt to have this car last a bit longer, we break out the Hammerite. I don't like the stuff for automotive applications, because it fails on so many levels, but it does have a use. Those nooks and crannies that so easily fill themselves with water and silt, it fills those up nicely. The inner rear wings are therefore liberally coated, then panelled in with utterly fake carbon fibre plastic to continue the interior look, whilst hiding the shame of using that paint in the first place.
The door cards, incidentally, are not to be that same plastic, because the regulations suggest that the material must not be "flammable." We like rules, they make us feel safe and secure, and interpreting them is our version of a narcotic, but that might mean not capable of supporting combustion, so aluminium will be used, then covered in some great carbon-effect vinyl we came across, thus looking like the right stuff whilst not proving flammable.
Most people think we cheat like crazy, but the reality is, every rule is looked at in this sort of detail. We will not knowingly break a rule, ever.
With the paint set, there is a little remedial work to do inside, because some of the cage didn't cover well. The whole interior is masked up, but for the cage. This, as a job, is right up there with sorting chicken carcasses.
Cage resprayed, and the glass can now go in, the sooner this can be made a little more dust-tight the better.
The order that you refit this stuff is important. The rear window is simple enough, but the side windows require you to first refit a few other parts.
There are three pieces of trim to refit first. You can refit these, as they weigh almost nothing, and they do finish the car off. There is the strip of stainless trim that runs along the bottom of the side window, and that's first. Then the B pillar trim, and then that big fake vent that makes the giant buttress on the car look like it has an actual point to it. Only then can the side window go in, but they pop in so easily, with just the aid of a single screwdriver.
I swear that if you wanted to break into an XJS you could do so in under 20 seconds with a single screwdriver, without causing any damage at all.
Of course, being this project, these pieces are not going back as Jaguar intended. She likes to look a little bit special. The theme is certainly carbon-fibre heavy.
But finally, the car has a vague sense of enclosure. No screen or doors, but on the way.
Work on the panels continues. Slowly, and without much enthusiasm. Do a bit, walk away.
The car's other components now get some attention as the project bursts into that flurry of activity that marks assembly.
The new radiator mounting panel loses some of it's elegance as form makes way for function. It looked great, but it didn't actually hold the radiator in properly, and that's a bit daft even by my standards.
The wiring is clipped into place, which for a bespoke loom is a bespoke job, and the rivet gun refits all the clips that were removed from the car during the disassembly, allowing the interior fuel and brake lines to be secured.
Time consuming, but necessary. Pull cables can go back in, along with the ecu vacuum tubing, extinguisher tubes and nozzles, and main power cable all clipped into one big bundle along the tunnel, after all why not have the car's spine carry its primary services as well as transmit motive force.
Fuel filler goes back into place, after the usual swearing about the rubber tank neck that really doesn't like to co-operate in the cold of a winter evening. Looks a little lonely now, floating around all by itself in the middle of a panel.
This does now mean, however, that the car has a fuel system again, swirl pot, pump and pipes are all already in. Add petrol and power and we can squirt petrol all over the place. Probably ought to reconnect the other end to the engine, though the plan is still to pull that out again to do the front subframe swap. This does rather depend on how long it will take to have the new one blasted and plated though, and I remain in two minds on the point because of the "not too many changes at once" concept.
Given we can have an engine out in ten minutes at this stage of the build, this isn't as mental as it sounds.
Two weeks to the trackday, three days off work plus two weekends. It will be close, but it will be done.
Back to those damned panels.....